> ## Documentation Index
> Fetch the complete documentation index at: https://wb-21fd5541-docs-hivemind-launch.mintlify.site/llms.txt
> Use this file to discover all available pages before exploring further.
# 코드에서 평가 데이터 기록하기
> Python 및 TypeScript 코드에서 평가 데이터를 기록하는 유연하고 점진적인 방법
`EvaluationLogger`는 Python 또는 TypeScript 코드에서 직접 평가 데이터를 기록할 수 있는 유연하고 점진적인 방법을 제공합니다. Weave의 내부 데이터 유형을 자세히 알 필요 없이, 로거를 인스턴스화한 뒤 해당 메서드(`log_prediction`, `log_score`, `log_summary`)를 사용해 평가 step을 기록하면 됩니다.
이 접근 방식은 전체 데이터셋이나 모든 scorer가 처음부터 정의되어 있지 않을 수 있는 복잡한 워크플로에서 특히 유용합니다.
미리 정의된 `Dataset`과 `Scorer` 객체 목록이 필요한 표준 `Evaluation` 객체와 달리, `EvaluationLogger`를 사용하면 개별 예측과 그에 해당하는 점수를 사용할 수 있게 되는 대로 점진적으로 기록할 수 있습니다.
**더 체계적인 평가를 선호하시나요?**
미리 정의된 데이터셋과 scorer를 갖춘, 더 구조화된 평가 프레임워크를 원한다면 [Weave의 표준 Evaluation 프레임워크](../core-types/evaluations)를 참조하세요.
`EvaluationLogger`는 유연성을 제공하고, 표준 프레임워크는 구조와 가이드를 제공합니다.
## 기본 워크플로
1. *로거 초기화:* `EvaluationLogger` 인스턴스를 생성하고, 필요에 따라 `model` 및 `dataset`에 대한 메타데이터를 전달합니다. 생략하면 기본값이 사용됩니다.
LLM 호출(예: OpenAI)의 토큰 사용량과 비용을 수집하려면 LLM을 호출하기 \*\*전에 `EvaluationLogger`를 초기화하세요.
먼저 LLM을 호출하고 나중에 예측을 로깅하면 토큰 및 비용 데이터는 수집되지 않습니다.
2. *예측 로깅:* 시스템의 각 입력/출력 쌍에 대해 `log_prediction()`을 호출합니다.
3. *점수 로깅:* 반환된 `ScoreLogger`를 사용해 해당 예측에 대한 `log_score()`를 호출합니다. 예측마다 여러 점수를 기록할 수 있습니다.
4. *예측 완료:* 예측을 최종 확정하려면 점수를 로깅한 뒤 항상 `finish()`를 호출합니다.
5. *요약 로깅:* 모든 예측 처리가 끝나면 `log_summary()`를 호출해 점수를 집계하고 선택 커스텀 메트릭을 추가합니다.
예측에 대해 `finish()`를 호출한 후에는 더 이상 점수를 로깅할 수 없습니다.
설명한 워크플로를 보여주는 Python 코드는 [기본 예제](#basic-example)를 참조하세요. 출력과 모든 점수를 한 번에 사용할 수 있다면 Python 사용자는 [`log_example()`](#simplified-logging-with-log_example)을 사용해 2\~4단계를 단일 Call로 결합할 수 있습니다.
## 기본 예제
다음 예제에서는 `EvaluationLogger`를 사용해 기존 코드에 인라인으로 예측과 점수를 로깅하는 방법을 보여줍니다.
`user_model` 모델 함수는 입력 목록에 대해 정의되며 적용됩니다. 각 예제마다:
* 입력과 출력은 `log_prediction`을 사용해 로깅됩니다.
* 단순한 정확성 점수(`correctness_score`)는 `log_score`를 통해 로깅됩니다.
* `finish()`는 해당 예측에 대한 로깅을 마무리합니다.
마지막으로 `log_summary`는 집계 메트릭을 기록하고 Weave에서 점수 자동 요약을 트리거합니다.
```python lines theme={null}
import weave
from openai import OpenAI
from weave import EvaluationLogger
weave.init('your-team/your-project')
# 토큰 추적을 위해 모델 호출 전에 EvaluationLogger를 초기화하세요
eval_logger = EvaluationLogger(
model="my_model",
dataset="my_dataset"
)
# 예제 입력 데이터 (원하는 데이터 구조를 사용할 수 있습니다)
eval_samples = [
{'inputs': {'a': 1, 'b': 2}, 'expected': 3},
{'inputs': {'a': 2, 'b': 3}, 'expected': 5},
{'inputs': {'a': 3, 'b': 4}, 'expected': 7},
]
# OpenAI를 사용한 예제 모델 로직
@weave.op
def user_model(a: int, b: int) -> int:
oai = OpenAI()
response = oai.chat.completions.create(
messages=[{"role": "user", "content": f"What is {a}+{b}?"}],
model="gpt-4o-mini"
)
# 응답을 어떤 방식으로든 활용합니다 (여기서는 단순하게 a + b를 반환합니다)
return a + b
# 예제를 순회하며 예측하고 로깅합니다
for sample in eval_samples:
inputs = sample["inputs"]
model_output = user_model(**inputs) # 입력을 kwargs로 전달합니다
# 예측 입력과 출력을 로깅합니다
pred_logger = eval_logger.log_prediction(
inputs=inputs,
output=model_output
)
# 이 예측에 대한 점수를 계산하고 로깅합니다
expected = sample["expected"]
correctness_score = model_output == expected
pred_logger.log_score(
scorer="correctness", # 스코어러의 단순 문자열 이름
score=correctness_score
)
# 이 특정 예측에 대한 로깅을 완료합니다
pred_logger.finish()
# 전체 평가에 대한 최종 요약을 로깅합니다.
# Weave는 위에서 로깅된 'correctness' 점수를 자동으로 집계합니다.
summary_stats = {"subjective_overall_score": 0.8}
eval_logger.log_summary(summary_stats)
print("Evaluation logging complete. View results in the Weave UI.")
```
TypeScript SDK는 두 가지 API 패턴을 제공합니다:
1. **Fire-and-forget API**(대부분의 경우 권장): 동기식 비차단 로깅을 위해 `await` 없이 `logPrediction()`을 사용
2. **Awaitable API**: 계속 진행하기 전에 오퍼레이션이 완료되도록 해야 할 때 `await`와 함께 `logPredictionAsync()`를 사용
다음과 같은 경우에는 **fire-and-forget**를 권장합니다:
* **높은 처리량**: 각 로깅 오퍼레이션을 기다리지 않고 여러 예측을 병렬로 처리
* **최소한의 코드 변경**: 기존 async/await 흐름을 재구성하지 않고 평가 로깅 추가
* **단순성**: 대부분의 평가 시나리오에서 상용구 코드가 더 적고 문법이 더 깔끔함
fire-and-forget 패턴이 안전한 이유는 `logSummary()`가 결과를 집계하기 전에 보류 중인 모든 오퍼레이션이 완료될 때까지 자동으로 기다리기 때문입니다.
다음 예제는 fire-and-forget 패턴으로 모델 예측을 평가합니다. 평가 로거를 설정하고, 세 개의 테스트 샘플에 대해 단순한 모델을 실행한 다음, `await`를 사용하지 않고 예측을 로깅합니다:
```typescript lines {36,50} theme={null}
import weave, { EvaluationLogger } from "weave"
import OpenAI from "openai"
await weave.init("your-team/your-project")
// 토큰 추적을 보장하려면 모델 호출 전에 EvaluationLogger를 초기화하세요
const evalLogger = new EvaluationLogger({
name: "my-eval",
model: "my_model",
dataset: "my_dataset"
})
// 예제 입력 데이터
const evalSamples = [
{ inputs: { a: 1, b: 2 }, expected: 3 },
{ inputs: { a: 2, b: 3 }, expected: 5 },
{ inputs: { a: 3, b: 4 }, expected: 7 }
]
// OpenAI를 사용한 예제 모델 로직
const userModel = weave.op(async function userModel(a: number, b: number): Promise {
const oai = new OpenAI()
const response = await oai.chat.completions.create({
messages: [{ role: "user", content: `What is ${a}+${b}?` }],
model: "gpt-4o-mini"
})
return a + b
})
// 예제를 순회하며 fire-and-forget 패턴으로 예측 및 로깅
for (const sample of evalSamples) {
const { inputs } = sample
const modelOutput = await userModel(inputs.a, inputs.b)
// Fire-and-forget: logPrediction에 await 불필요
const scoreLogger = evalLogger.logPrediction(inputs, modelOutput)
// 이 예측에 대한 점수 계산 및 로깅
const correctnessScore = modelOutput === sample.expected
// Fire-and-forget: logScore에 await 불필요
scoreLogger.logScore("correctness", correctnessScore)
// Fire-and-forget: finish에 await 불필요
scoreLogger.finish()
}
// logSummary는 내부적으로 보류 중인 모든 오퍼레이션이 완료될 때까지 기다립니다
const summaryStats = { subjective_overall_score: 0.8 }
await evalLogger.logSummary(summaryStats)
console.log("Evaluation logging complete. View results in the Weave UI.")
```
오류 처리나 순차적 의존성을 관리할 때처럼, 각 오퍼레이션이 완료된 후에 다음 단계로 진행되도록 보장해야 한다면 await 가능한 API를 사용하세요.
다음 예제에서는 `await` 없이 `logPrediction()`을 호출하는 대신, 각 오퍼레이션이 완료된 후 다음 오퍼레이션으로 넘어가도록 `await`와 함께 `logPredictionAsync()`를 사용합니다:
```typescript lines theme={null}
// logPrediction 대신 logPredictionAsync 사용
const scoreLogger = await evalLogger.logPredictionAsync(inputs, modelOutput)
// 각 오퍼레이션을 await
await scoreLogger.logScore("correctness", correctnessScore)
await scoreLogger.finish()
```
## `log_example()`를 사용한 간소화된 로깅
`log_example()`을 사용하면 입력, 출력, 그리고 점수를 단일 Call로 로깅할 수 있습니다. 이 편의 방법은 `log_prediction()`, `log_score()`, `finish()`를 한 단계로 결합하며, 배치 또는 오프라인 평가 중처럼 로깅할 입력, 모델 출력, 점수가 이미 준비되어 있을 때 유용합니다.
```python lines theme={null}
import weave
from weave import EvaluationLogger
weave.init('your-team-name/your-project-name')
eval_logger = EvaluationLogger(
model="my_model",
dataset="my_dataset"
)
eval_samples = [
{'inputs': {'a': 1, 'b': 2}, 'expected': 3},
{'inputs': {'a': 2, 'b': 3}, 'expected': 5},
{'inputs': {'a': 3, 'b': 4}, 'expected': 7},
]
for sample in eval_samples:
inputs = sample['inputs']
output = inputs['a'] + inputs['b']
eval_logger.log_example(
inputs=inputs,
output=output,
scores={"correctness": output == sample['expected']}
)
eval_logger.log_summary({"avg_score": 1.0})
```
위의 `log_example()` 호출은 다음과 동일합니다:
```python theme={null}
pred = eval_logger.log_prediction(inputs=inputs, output=output)
pred.log_score(scorer="correctness", score=output == sample['expected'])
pred.finish()
```
Weave TypeScript SDK에서는 `log_example()`을 사용할 수 없습니다. TypeScript 사용자는 [기본 예제](#basic-example)에 나와 있는 `logPrediction()` 및 `logScore()` 패턴을 사용하세요.
## 고급 활용
`EvaluationLogger`는 더 복잡한 평가 시나리오를 지원할 수 있도록 기본 워크플로를 넘어서는 유연한 사용 패턴을 제공합니다. 이 섹션에서는 자동 리소스 관리를 위한 컨텍스트 매니저 사용, 모델 실행과 로깅의 분리, 리치 미디어 데이터 처리, 그리고 여러 모델 평가를 나란히 비교하는 등 고급 기법을 다룹니다.
### 컨텍스트 관리자 사용
`EvaluationLogger`는 예측과 점수 모두에 대해 컨텍스트 관리자(`with` 문)를 지원합니다. 이를 사용하면 코드를 더 깔끔하게 작성할 수 있고, 리소스를 자동으로 정리할 수 있으며, LLM judge call과 같은 중첩된 오퍼레이션도 더 효과적으로 추적할 수 있습니다.
이 문맥에서 `with` 문을 사용하면 다음과 같은 이점이 있습니다.
* 컨텍스트를 벗어날 때 `finish()`가 자동으로 호출됨
* 중첩된 LLM call에 대한 토큰/비용 추적 개선
* prediction 컨텍스트 내에서 모델 실행 후 output 설정 가능
```python lines {16,24,31,40} theme={null}
import openai
import weave
weave.init("nested-evaluation-example")
oai = openai.OpenAI()
# 로거 초기화
ev = weave.EvaluationLogger(
model="gpt-4o-mini",
dataset="joke_dataset"
)
user_prompt = "Tell me a joke"
# prediction에 컨텍스트 관리자 사용 - finish()를 호출할 필요 없음
with ev.log_prediction(inputs={"user_prompt": user_prompt}) as pred: # 컨텍스트 내에서 모델 호출 수행
result = oai.chat.completions.create(
model="gpt-4o-mini",
messages=[{"role": "user", "content": user_prompt}],
)
# 모델 호출 후 output 설정
pred.output = result.choices[0].message.content
# 단순한 점수 로깅
pred.log_score("correctness", 1.0)
pred.log_score("ambiguity", 0.3)
# LLM 호출이 필요한 점수에는 중첩된 컨텍스트 관리자 사용
with pred.log_score("llm_judge") as score:
judge_result = oai.chat.completions.create(
model="gpt-4o-mini",
messages=[
{"role": "system", "content": "Rate how funny the joke is from 1-5"},
{"role": "user", "content": pred.output},
],
)
# 계산 후 점수 값 설정
score.value = judge_result.choices[0].message.content
# 'with' 블록을 벗어나면 finish()가 자동으로 호출됨
ev.log_summary({"avg_score": 1.0})
```
이 패턴을 사용하면 모든 중첩된 오퍼레이션이 추적되고 상위 prediction에 귀속되므로, Weave UI에서 정확한 토큰 사용량과 비용 데이터를 확인할 수 있습니다.
TypeScript에는 컨텍스트 관리자를 위한 Python의 `with` 문 패턴이 없습니다. 대신 명시적으로 `finish()`를 호출하는 fire-and-forget 패턴을 사용하세요.
다음 예제에서는 prediction을 로깅하고, 단순한 점수와 LLM judge 점수를 추가한 다음, `finish()`로 prediction을 완료합니다.
```typescript lines {43} theme={null}
import weave from 'weave';
import OpenAI from 'openai';
import {EvaluationLogger} from 'weave/evaluationLogger';
await weave.init('your-team/your-project');
const oai = new OpenAI();
// 로거 초기화
const ev = new EvaluationLogger({
name: 'joke-eval',
model: 'gpt-4o-mini',
dataset: 'joke_dataset',
});
const userPrompt = 'Tell me a joke';
// 모델 output 가져오기
const result = await oai.chat.completions.create({
model: 'gpt-4o-mini',
messages: [{role: 'user', content: userPrompt}],
});
const modelOutput = result.choices[0].message.content;
// output과 함께 prediction 로깅
const pred = ev.logPrediction({user_prompt: userPrompt}, modelOutput);
// 단순한 점수 로깅
pred.logScore('correctness', 1.0);
pred.logScore('ambiguity', 0.3);
// LLM judge 점수의 경우 호출을 수행한 뒤 결과를 로깅
const judgeResult = await oai.chat.completions.create({
model: 'gpt-4o-mini',
messages: [
{role: 'system', content: 'Rate how funny the joke is from 1-5'},
{role: 'user', content: modelOutput || ''},
],
});
pred.logScore('llm_judge', judgeResult.choices[0].message.content);
// 점수 기록이 끝나면 finish를 명시적으로 호출
pred.finish();
await ev.logSummary({avg_score: 1.0});
```
TypeScript에는 컨텍스트 관리자를 통한 자동 정리 기능이 없지만, `logSummary()`는 결과를 집계하기 전에 완료되지 않은 prediction을 자동으로 마무리합니다. `finish()`를 명시적으로 호출하지 않으려면 이 동작을 활용할 수 있습니다.
### 기존 데이터셋에 연결하기
원시 데이터셋을 `log_prediction`에 `inputs`로 전달하면, Weave는 평가 run이 실행될 때마다 데이터를 다시 수집합니다. 그 결과 중복 데이터가 저장되며, 데이터셋이 크거나 많은 평가에서 이를 재사용하는 경우 저장 공간이 낭비될 수 있습니다.
이 중복을 방지하려면 평가를 실행하기 전에 먼저 데이터셋을 Weave에 게시한 다음, 게시된 데이터셋의 행을 `inputs`로 전달하세요. 그러면 Weave는 데이터를 다시 수집하는 대신 내부 참조를 사용해 게시된 행 참조를 해석합니다. 이 방식을 사용하면 표준 [Evaluation 프레임워크](../core-types/evaluations)와 동일하게 연결된 환경을 사용할 수 있으며, 각 예측은 Weave UI의 특정 데이터셋 행에 다시 연결됩니다.
다음 예제에서는 데이터셋을 게시하고 이를 `EvaluationLogger`에 연결한 뒤, 다른 데이터셋과 마찬가지로 조회하고 순회합니다.
```python theme={null}
import weave
from weave import EvaluationLogger
weave.init("your-team-name/your-project-name")
# 데이터셋 게시(한 번만 수행하면 됨)
dataset = weave.Dataset(
name="my_eval_dataset",
rows=[
{"question": "What is the capitol of France?", "expected": "Paris"},
{"question": "What U.S. state is Seattle in?", "expected": "Washington"},
{"question": "In what country is Mount Fuji located in?", "expected": "Japan"},
],
)
weave.publish(dataset)
# 게시된 데이터셋 조회
dataset = weave.ref("my_eval_dataset").get()
```
```typescript theme={null}
import weave, {EvaluationLogger, Dataset} from 'weave';
await weave.init('your-team-name/your-project-name');
// 데이터셋 게시(한 번만 수행하면 됨)
const dataset = new Dataset({
name: 'my_eval_dataset',
rows: [
{"question": "What is the capitol of France?", "expected": "Paris"},
{"question": "What U.S. state is Seattle in?", "expected": "Washington"},
{"question": "In what country is Mount Fuji located in?", "expected": "Japan"},
],
});
const datasetRef = await dataset.save();
// 게시된 데이터셋 조회
const published = await datasetRef.get();
```
### 로깅 전에 출력 먼저 계산하기
먼저 모델 출력을 계산한 다음, 예측과 점수를 별도로 로깅할 수 있습니다. 이렇게 하면 평가 로직과 로깅 로직을 더 명확하게 분리할 수 있습니다.
```python lines theme={null}
# 토큰 추적을 위해 모델을 호출하기 전에 EvaluationLogger를 초기화합니다
ev = EvaluationLogger(
model="example_model",
dataset="example_dataset"
)
# 토큰 추적을 위해 모델 출력(예: OpenAI Call)은 로거 초기화 후에 발생해야 합니다
outputs = [your_output_generator(**inputs) for inputs in your_dataset]
preds = [ev.log_prediction(inputs, output) for inputs, output in zip(your_dataset, outputs)]
for pred, output in zip(preds, outputs):
pred.log_score(scorer="greater_than_5_scorer", score=output > 5)
pred.log_score(scorer="greater_than_7_scorer", score=output > 7)
pred.finish()
ev.log_summary()
```
여러 예측을 병렬로 처리할 때는 fire-and-forget 패턴이 특히 유용합니다.
다음 예제에서는 `EvaluationLogger`의 여러 동시 인스턴스를 생성해 평가를 병렬로 일괄 처리합니다.
```typescript lines theme={null}
// 토큰 추적을 위해 모델을 호출하기 전에 EvaluationLogger를 초기화합니다
const ev = new EvaluationLogger({
name: 'parallel-eval',
model: 'example_model',
dataset: 'example_dataset'
});
// 토큰 추적을 위해 모델 출력(예: OpenAI Call)은 로거 초기화 후에 발생해야 합니다
const outputs = await Promise.all(
yourDataset.map(inputs => yourOutputGenerator(inputs))
);
// Fire-and-forget: 기다리지 않고 모든 예측을 처리합니다
const preds = yourDataset.map((inputs, i) =>
ev.logPrediction(inputs, outputs[i])
);
preds.forEach((pred, i) => {
const output = outputs[i];
// Fire-and-forget: await가 필요하지 않습니다
pred.logScore('greater_than_5_scorer', output > 5);
pred.logScore('greater_than_7_scorer', output > 7);
pred.finish();
});
// logSummary는 보류 중인 모든 오퍼레이션이 끝날 때까지 기다립니다
await ev.logSummary();
```
사용 가능한 컴퓨팅 리소스 범위 내에서 최대한 많은 평가를 병렬로 처리하기 위해 fire-and-forget 패턴을 사용할 수 있습니다.
### 리치 미디어 로깅
입력, 출력, 점수에는 이미지, 비디오, 오디오, 구조화된 테이블 같은 리치 미디어를 포함할 수 있습니다. `log_prediction` 또는 `log_score` 메서드에 dict 또는 미디어 객체를 전달하면 됩니다.
```python lines theme={null}
import io
import wave
import struct
from PIL import Image
import random
from typing import Any
import weave
def generate_random_audio_wave_read(duration=2, sample_rate=44100):
n_samples = duration \* sample_rate
amplitude = 32767 # 16비트 최대 진폭
buffer = io.BytesIO()
# 버퍼에 wave 데이터를 씁니다
with wave.open(buffer, 'wb') as wf:
wf.setnchannels(1)
wf.setsampwidth(2) # 16비트
wf.setframerate(sample_rate)
for _ in range(n_samples):
sample = random.randint(-amplitude, amplitude)
wf.writeframes(struct.pack(' dict[str, Any]:
return {
"result": random.randint(0, 10),
"image": image,
"audio": audio,
}
ev = EvaluationLogger(model="example_model", dataset="example_dataset")
for inputs in rich_media_dataset:
output = your_output_generator(\*\*inputs)
pred = ev.log_prediction(inputs, output)
pred.log_score(scorer="greater_than_5_scorer", score=output["result"] > 5)
pred.log_score(scorer="greater_than_7_scorer", score=output["result"] > 7)
ev.log_summary()
```
TypeScript SDK는 `weaveImage` 및 `weaveAudio` 함수를 사용해 이미지와 오디오를 로깅할 수 있도록 지원합니다. 다음 예제에서는 이미지와 오디오 파일을 로드하고, 이를 모델로 처리한 뒤, 점수와 함께 결과를 로깅합니다.
```typescript lines theme={null}
import weave, {EvaluationLogger} from 'weave';
import * as fs from 'fs';
await weave.init('your-team/your-project');
// 파일에서 이미지와 오디오를 로드합니다
const richMediaDataset = [
{
image: weave.weaveImage({data: fs.readFileSync('sample1.png')}),
audio: weave.weaveAudio({data: fs.readFileSync('sample1.wav')}),
},
{
image: weave.weaveImage({data: fs.readFileSync('sample2.png')}),
audio: weave.weaveAudio({data: fs.readFileSync('sample2.wav')}),
},
];
// 미디어를 처리하고 결과를 반환하는 모델
const yourOutputGenerator = weave.op(
async (inputs: {image: any; audio: any}) => {
const result = Math.floor(Math.random() * 10);
return {
result,
image: inputs.image,
audio: inputs.audio,
};
},
{name: 'yourOutputGenerator'}
);
const ev = new EvaluationLogger({
name: 'rich-media-eval',
model: 'example_model',
dataset: 'example_dataset',
});
for (const inputs of richMediaDataset) {
const output = await yourOutputGenerator(inputs);
// 입력과 출력 모두에 리치 미디어를 포함해 예측을 로깅합니다
const pred = ev.logPrediction(inputs, output);
pred.logScore('greater_than_5_scorer', output.result > 5);
pred.logScore('greater_than_7_scorer', output.result > 7);
pred.finish();
}
await ev.logSummary();
```
### 여러 평가 기록 및 비교
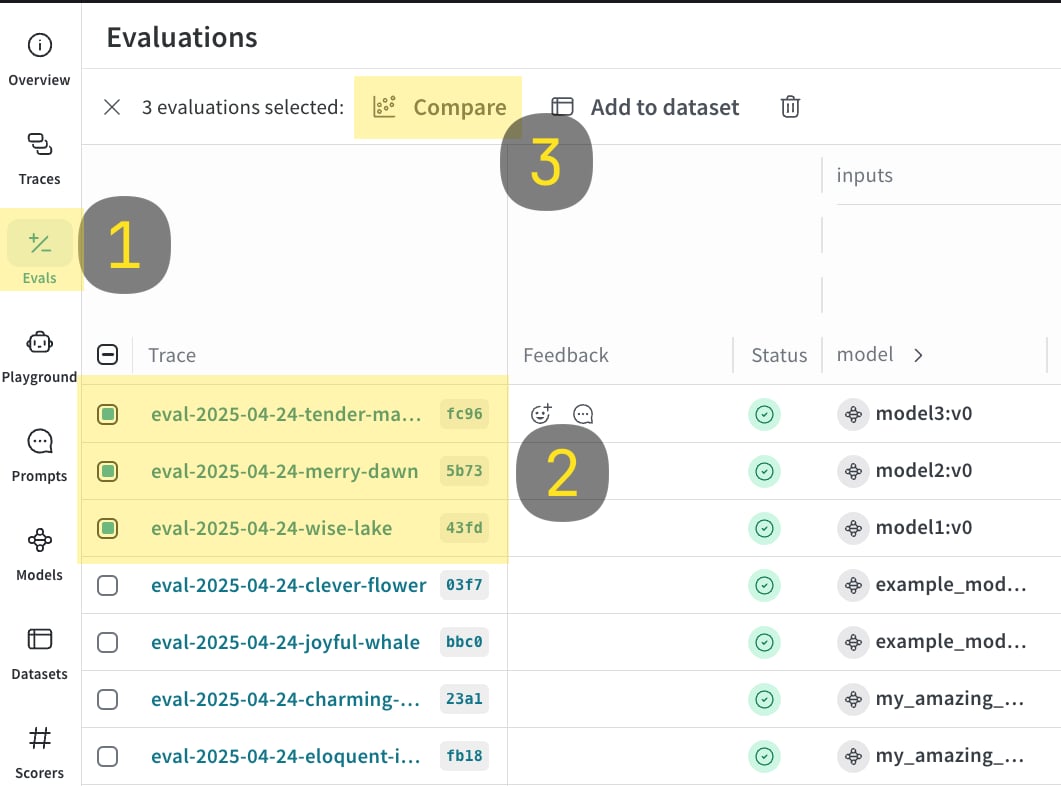
`EvaluationLogger`를 사용하면 여러 평가를 기록하고 비교할 수 있습니다.
1. 아래 코드 샘플을 실행합니다.
2. Weave UI에서 `Evals` 탭으로 이동합니다.
3. 비교하려는 eval을 선택합니다.
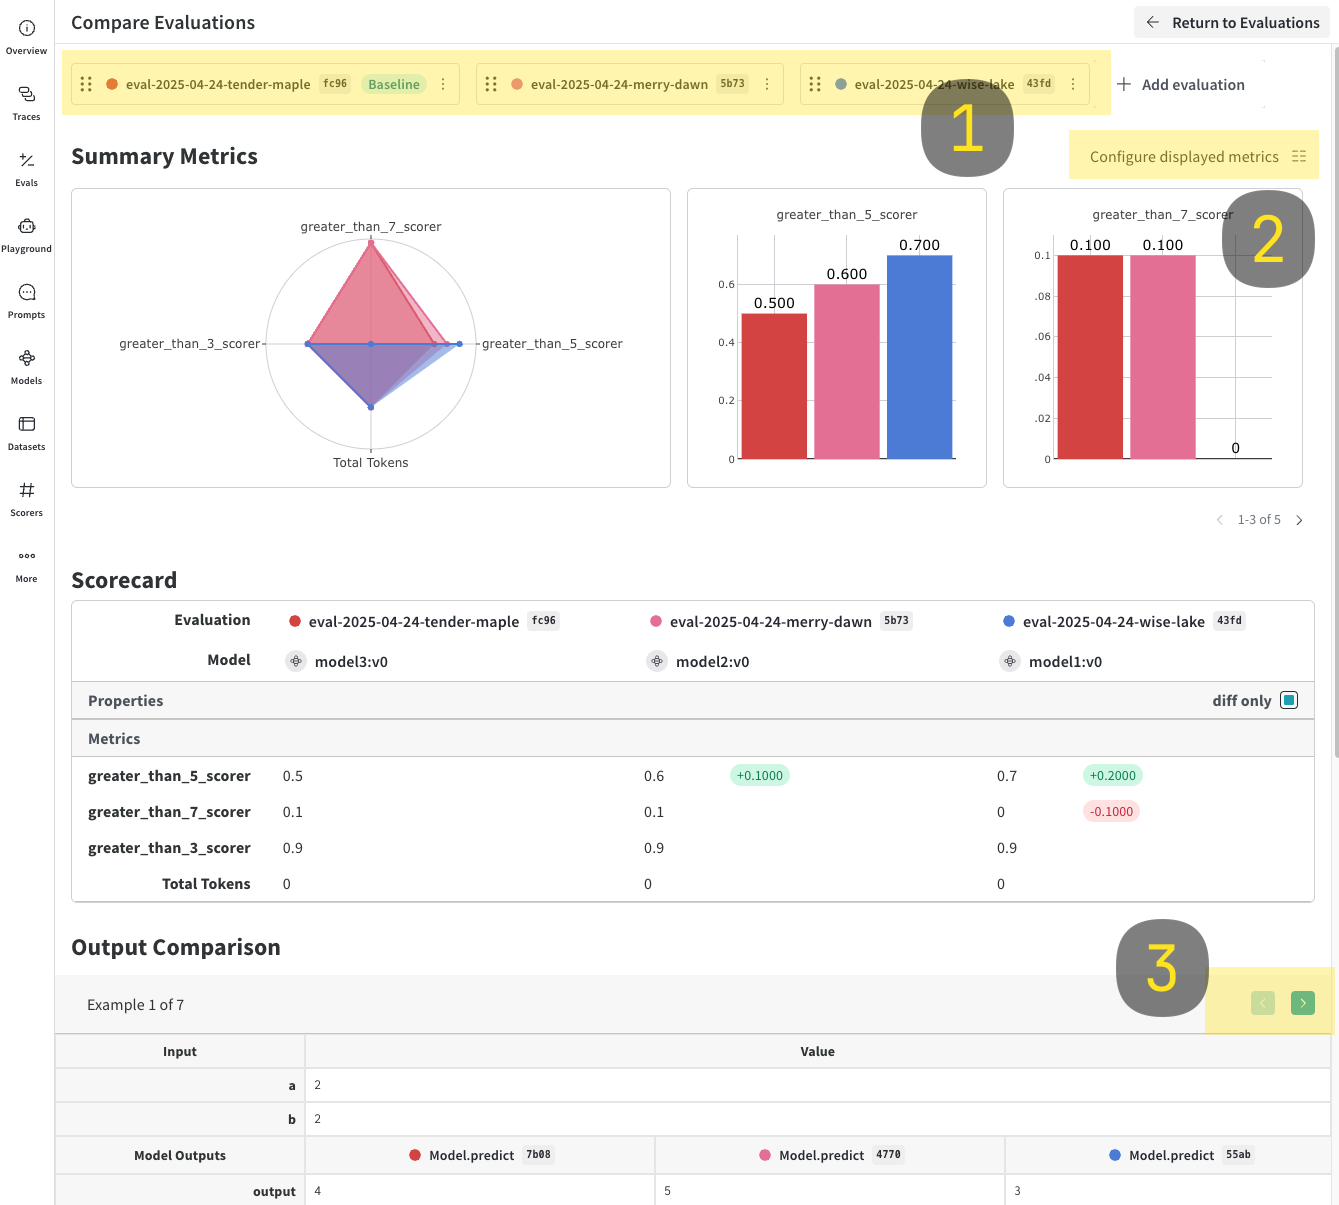
4. **Compare** 버튼을 클릭합니다. Compare 뷰에서 다음 작업을 할 수 있습니다.
* 추가하거나 제거할 Evals 선택
* 표시하거나 숨길 메트릭 선택
* 특정 예제를 페이지별로 살펴보며, 주어진 데이터셋에서 동일한 입력에 대해 서로 다른 모델이 어떻게 수행되었는지 확인
비교에 대한 자세한 내용은 [Comparisons](../tools/comparison)를 참조하세요.
```python lines theme={null}
import weave
models = [
"model1",
"model2",
{"name": "model3", "metadata": {"coolness": 9001}}
]
for model in models: # 토큰을 캡처하려면 모델 Call 전에 EvalLogger를 초기화해야 합니다
ev = EvaluationLogger(
name="comparison-eval",
model=model,
dataset="example_dataset",
scorers=["greater_than_3_scorer", "greater_than_5_scorer", "greater_than_7_scorer"],
eval_attributes={"experiment_id": "exp_123"}
)
for inputs in your_dataset:
output = your_output_generator(\*\*inputs)
pred = ev.log_prediction(inputs=inputs, output=output)
pred.log_score(scorer="greater_than_3_scorer", score=output > 3)
pred.log_score(scorer="greater_than_5_scorer", score=output > 5)
pred.log_score(scorer="greater_than_7_scorer", score=output > 7)
pred.finish()
ev.log_summary()
```
```typescript lines theme={null}
import weave from 'weave';
import {EvaluationLogger} from 'weave/evaluationLogger';
import {WeaveObject} from 'weave/weaveObject';
await weave.init('your-team/your-project');
const models = [
'model1',
'model2',
new WeaveObject({name: 'model3', metadata: {coolness: 9001}})
];
for (const model of models) {
// 토큰을 캡처하려면 모델 Call 전에 EvalLogger를 초기화해야 합니다
const ev = new EvaluationLogger({
name: 'comparison-eval',
model: model,
dataset: 'example_dataset',
description: 'Model comparison evaluation',
scorers: ['greater_than_3_scorer', 'greater_than_5_scorer', 'greater_than_7_scorer'],
attributes: {experiment_id: 'exp_123'}
});
for (const inputs of yourDataset) {
const output = await yourOutputGenerator(inputs);
// 깔끔하고 효율적인 로깅을 위한 fire-and-forget 패턴
const pred = ev.logPrediction(inputs, output);
pred.logScore('greater_than_3_scorer', output > 3);
pred.logScore('greater_than_5_scorer', output > 5);
pred.logScore('greater_than_7_scorer', output > 7);
pred.finish();
}
await ev.logSummary();
}
```
## 사용 팁
* 각 예측 후에는 즉시 `finish()`를 호출하세요.
* 개별 예측에 연결되지 않은 메트릭(예: 전체 지연 시간)을 기록하려면 `log_summary`를 사용하세요.
* 리치 미디어 로깅은 정성적 분석에 매우 유용합니다.
* **자동 종료 동작**: 명확성을 위해 각 예측마다 `finish()`를 명시적으로 호출하는 것을 권장하지만, `logSummary()`는 완료되지 않은 예측을 자동으로 모두 종료합니다. 단, 스크립트에서 `finish()`를 호출한 이후에는 더 이상 점수를 기록할 수 없습니다.
* **설정 옵션**: `name`, `description`, `dataset`, `model`, `scorers`, `attributes` 등의 설정 옵션을 사용해 Weave UI에서 평가를 구성하고 필터링하세요.