> ## Documentation Index
> Fetch the complete documentation index at: https://wb-21fd5541-docs-hivemind-launch.mintlify.site/llms.txt
> Use this file to discover all available pages before exploring further.
# Overview
> W&B Automations를 생성하고 관리해 ML 워크플로를 간소화하세요
이 기능을 사용하려면 [Pro 또는 Enterprise 플랜](https://wandb.ai/site/pricing/)이 필요합니다.
이 페이지에서는 W\&B [자동화](/ko/models/automations)를 생성하고 관리하는 방법의 개요를 설명합니다. 자세한 지침은 [Slack 자동화 만들기](/ko/models/automations/create-automations/slack) 또는 [웹훅 자동화 만들기](/ko/models/automations/create-automations/webhook)를 참고하세요.
자동화 관련 튜토리얼을 찾고 계신가요?
* [모델 평가 및 배포를 위해 GitHub Action을 자동으로 트리거하는 방법 알아보기](https://wandb.ai/wandb/wandb-model-cicd/reports/Model-CI-CD-with-W-B--Vmlldzo0OTcwNDQw).
* [모델을 SageMaker 엔드포인트에 자동으로 배포하는 과정을 보여주는 비디오 보기](https://www.youtube.com/watch?v=s5CMj_w3DaQ).
* [자동화를 소개하는 비디오 시리즈 보기](https://youtube.com/playlist?list=PLD80i8An1OEGECFPgY-HPCNjXgGu-qGO6\&feature=shared).
## 요구 사항
* Team Admin은 팀의 Projects에 대한 자동화과 웹훅, 시크릿, Slack 인테그레이션 같은 자동화 컴포넌트를 생성하고 관리할 수 있습니다. [Team settings](/ko/platform/app/settings-page/teams)를 참고하세요.
* 레지스트리 자동화를 생성하려면 레지스트리에 대한 액세스 권한이 있어야 합니다. [Configure Registry access](/ko/models/registry/configure_registry/#registry-roles)를 참고하세요.
* Slack 자동화를 생성하려면 선택한 Slack 인스턴스와 채널에 게시할 권한이 있어야 합니다.
## 자동화 생성
프로젝트 또는 레지스트리의 **Automations** 탭에서 자동화를 생성합니다. 자동화를 생성하는 전체 과정은 다음과 같습니다.
1. 필요한 경우 access token, 비밀번호, SSH 키처럼 자동화에 필요한 각 민감한 문자열에 대해 [W\&B 시크릿을 생성](/ko/platform/secrets)합니다. 시크릿은 **Team Settings**에서 정의합니다. 시크릿은 가장 일반적으로 웹훅 자동화에서 사용됩니다.
2. W\&B가 사용자를 대신해 Slack에 게시하거나 웹훅을 실행할 수 있도록 팀 수준의 웹훅 또는 Slack 인테그레이션을 설정합니다. 하나의 웹훅 또는 Slack 인테그레이션을 여러 자동화에서 사용할 수 있습니다. 이러한 작업은 **Team Settings**에서 정의합니다.
3. 프로젝트 또는 레지스트리에서 자동화를 생성하고, 감지할 이벤트와 수행할 작업(예: Slack에 게시 또는 웹훅 실행)을 지정합니다. 웹훅 자동화를 생성할 때는 전송할 payload도 설정합니다.
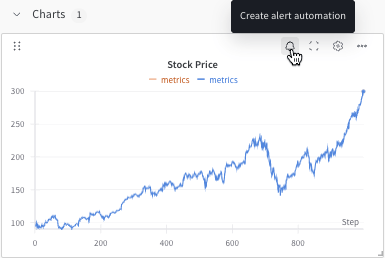
또는 Workspace의 선형 플롯에서, 표시된 메트릭에 대한 [run 메트릭 자동화](/ko/models/automations/automation-events/#run-events)를 빠르게 생성할 수 있습니다.
1. 패널 위에 마우스를 올린 다음 패널 상단의 종 아이콘을 클릭합니다.
 2. basic 또는 advanced 설정 컨트롤을 사용해 자동화를 설정합니다. 예를 들어 run 필터를 적용해 자동화 범위를 제한하거나 절대 임곗값을 설정할 수 있습니다.
자세한 내용은 다음을 참고하세요.
* [Slack 자동화 만들기](/ko/models/automations/create-automations/slack)
* [웹훅 자동화 만들기](/ko/models/automations/create-automations/webhook)
2. basic 또는 advanced 설정 컨트롤을 사용해 자동화를 설정합니다. 예를 들어 run 필터를 적용해 자동화 범위를 제한하거나 절대 임곗값을 설정할 수 있습니다.
자세한 내용은 다음을 참고하세요.
* [Slack 자동화 만들기](/ko/models/automations/create-automations/slack)
* [웹훅 자동화 만들기](/ko/models/automations/create-automations/webhook)
## 자동화 보기 및 관리
프로젝트 또는 레지스트리의 **Automations** 탭에서 자동화를 보고 관리할 수 있습니다.
* 자동화의 세부 정보를 보려면 해당 이름을 클릭합니다.
* 자동화의 실행 이력을 보려면 해당 이름을 클릭한 다음 **History** 탭을 선택합니다. 자세한 내용은 [자동화 이력 보기](/ko/models/automations/view-automation-history)를 참조하세요.
* 자동화를 편집하려면 해당 자동화의 **action ()** 작업 메뉴를 클릭한 다음 **Edit automation**을 클릭합니다.
* 자동화를 삭제하려면 해당 자동화의 **action ()** 작업 메뉴를 클릭한 다음 **Delete automation**을 클릭합니다.
## 다음 단계
* [Automations 튜토리얼](/ko/models/automations/tutorial): W\&B App에서 [프로젝트 run 실패 Alert](/ko/models/automations/project-automation-tutorial) 또는 [레지스트리 별칭-웹훅 자동화](/ko/models/automations/registry-automation-tutorial)를 만들어 보세요.
* [자동화 이벤트 및 범위](/ko/models/automations/automation-events).
* [Slack 자동화 만들기](/ko/models/automations/create-automations/slack).
* [웹훅 자동화 만들기](/ko/models/automations/create-automations/webhook).
* [시크릿 만들기](/ko/platform/secrets).