> ## Documentation Index
> Fetch the complete documentation index at: https://wb-21fd5541-docs-hivemind-launch.mintlify.site/llms.txt
> Use this file to discover all available pages before exploring further.
# 概要
> W&Bオートメーションを作成・管理して、MLワークフローを効率化
この機能の利用には、[Pro または Enterprise プラン](https://wandb.ai/site/pricing/)が必要です。
このページでは、W\&Bの[オートメーション](/ja/models/automations)の作成と管理の概要を説明します。詳しい手順については、[Slack オートメーション を作成する](/ja/models/automations/create-automations/slack)または[webhook オートメーション を作成する](/ja/models/automations/create-automations/webhook)を参照してください。
オートメーション の関連チュートリアルをお探しですか?
* [モデルの評価とデプロイのために GitHub Action を自動でトリガーする方法を学ぶ](https://wandb.ai/wandb/wandb-model-cicd/reports/Model-CI-CD-with-W-B--Vmlldzo0OTcwNDQw).
* [モデルを SageMaker エンドポイントに自動でデプロイするデモ動画を見る](https://www.youtube.com/watch?v=s5CMj_w3DaQ).
* [オートメーション を紹介する動画シリーズを見る](https://youtube.com/playlist?list=PLD80i8An1OEGECFPgY-HPCNjXgGu-qGO6\&feature=shared).
## 要件
* チーム管理者は、チームの project に対するオートメーションに加えて、Webhook、シークレット、Slack インテグレーションなど、オートメーションを構成するコンポーネントも作成および管理できます。[Team settings](/ja/platform/app/settings-page/teams)を参照してください。
* Registry のオートメーションを作成するには、Registry へのアクセス権が必要です。[Configure Registry access](/ja/models/registry/configure_registry/#registry-roles)を参照してください。
* Slack オートメーションを作成するには、選択した Slack インスタンスおよびチャンネルに投稿する権限が必要です。
## オートメーションを作成する
project または Registry の **Automations** タブからオートメーションを作成します。オートメーションの作成手順の概要は次のとおりです。
1. 必要に応じて、アクセストークン、パスワード、SSH キーなど、オートメーションに必要な機密文字列ごとに [W\&B シークレットを作成](/ja/platform/secrets)します。シークレットは **Team Settings** で定義します。シークレットは webhook オートメーションで最もよく使われます。
2. チームレベルの webhook または Slack インテグレーションを設定して、W\&B が代理で Slack に投稿したり、webhook を実行したりできるように認可します。1 つの webhook または Slack インテグレーションを複数のオートメーションで使用できます。これらのアクションは **Team Settings** で定義します。
3. project または Registry でオートメーションを作成し、監視するイベントと実行するアクション (Slack への投稿や webhook の実行など) を指定します。webhook オートメーションを作成する場合は、送信するペイロードを設定します。
また、Workspace の折れ線グラフから、そのグラフに表示されているメトリクス用の [run メトリクス オートメーション](/ja/models/automations/automation-events/#run-events) をすばやく作成することもできます。
1. パネルにカーソルを合わせて、パネル上部のベルアイコンをクリックします。
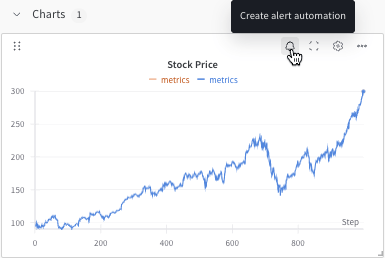 2. 基本または高度な設定コントロールを使用してオートメーションを設定します。たとえば、run フィルターを適用してオートメーションの対象範囲を制限したり、絶対しきい値を設定したりできます。
詳細は、以下を参照してください。
* [Slack オートメーションを作成する](/ja/models/automations/create-automations/slack)
* [webhook オートメーションを作成する](/ja/models/automations/create-automations/webhook)
2. 基本または高度な設定コントロールを使用してオートメーションを設定します。たとえば、run フィルターを適用してオートメーションの対象範囲を制限したり、絶対しきい値を設定したりできます。
詳細は、以下を参照してください。
* [Slack オートメーションを作成する](/ja/models/automations/create-automations/slack)
* [webhook オートメーションを作成する](/ja/models/automations/create-automations/webhook)
## オートメーションの表示と管理
プロジェクトまたはレジストリの **Automations** タブで、オートメーションを表示、管理できます。
* オートメーションの詳細を表示するには、その名前をクリックします。
* オートメーションの実行履歴を表示するには、その名前をクリックし、**History** タブを選択します。詳しくは、[オートメーションの履歴を表示する](/ja/models/automations/view-automation-history)を参照してください。
* オートメーションを編集するには、その**アクション ()** メニューをクリックし、**Edit automation** をクリックします。
* オートメーションを削除するには、その**アクション ()** メニューをクリックし、**Delete automation** をクリックします。
## 次のステップ
* [Automations チュートリアル](/ja/models/automations/tutorial): W\&B App で、[project の run 失敗アラート](/ja/models/automations/project-automation-tutorial) または [Registry の alias から webhook へのオートメーション](/ja/models/automations/registry-automation-tutorial) を作成します。
* [Automation events and scopes](/ja/models/automations/automation-events)。
* [Slack オートメーションを作成する](/ja/models/automations/create-automations/slack)。
* [webhook オートメーションを作成する](/ja/models/automations/create-automations/webhook)。
* [シークレット を作成する](/ja/platform/secrets)。